Wednesday, November 27, 2013

Making Pumpkin Puree

I love pumpkin... muffins, bars, pie, for decorations.  This fall I have been really in for the mood for pumpkins anything... so I have been baking a lot with pumpkins.  We didn't get too many pumpkin pie pumpkins from our garden.  But, we bought a couple more.  I like using fresh pumpkin for baking, but I have been using a lot of the canned stuff this fall.  Making your own pumpkin puree really isn't that hard.


Preheat your oven to 350 degrees.
You can bake the pumpkins at a higher or lower temp. if you want.
Cut the pumpkins in half.  Scoop out the seeds.  Go ahead and prepare the seeds to make pumpkin seeds.


Line a bar pan with parchment paper.
Pour a little water in the pan so that it covers the bottom.
Place the pumpkins upside down in the pan.
Bake until the pumpkins are tender.  You should be able to poke it with a fork.  It'll be about an hour.


When the pumpkins are down, scoop out the pumpkin inside.

Put the pumpkin in the food processor to puree.


Once the pumpkin is all pureed, bake with it, or put it in the freezer to use later.

I made some pumpkin seeds.  I soaked them in salt water over night.  The next day I mixed them with a little butter and salt and roasted them.  I thought they were pretty good.


I love pumpkin muffins.  Isn't the mini loaf cute?  I baked it for one of the bake sales to earn booster points.
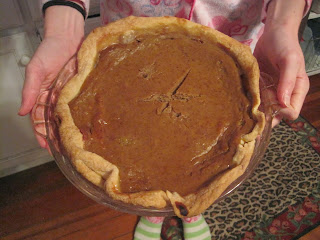

I made 3 pumpkin pies.  Two I will bring to Thanksgiving and the other is going into the freezer for us to pull out sometime when we want a pumpkin pie.

  Happy Thanksgiving!!!

Sunday, November 24, 2013

Sweet and Salty Chex Mix


 I am teaching 2 and 3 year olds Sunday school...  they have a lot of energy, are very rambunctious, and require lots of attention.  I am the teacher and my mom is the assistance.  We signed up last minuet to do it because our church needed someone to teach this age still.  Well, my mom doesn't like teaching Sunday school (she has done it in the past), so she said that if I was the teacher and did all the lesson planning, she would be the assistant.  We also have a college student helping, and sometimes my sister helps.
The most children we could have at once is 11.  But, usually they aren't all there.  Two and three year olds don't have a very long attention spand and it is hard to get them to do much.  But, they are really cute and we get some good laughs out of them.

Since Thanksgiving is this week, I wanted to bring them a little treat to take home.  I am going to try to focus the lesson on being thankful this week, but we are also going to do a regular lesson because it doesn't take them long to do anything.
Here is some yummy chex mix that is great for snacks, little gifts, etc.


 Cut open a paper grocery bag.  Immediately after the cereal comes out of the oven, pour onto the paper and.  Let it cool.


 Since I am making this for my Sunday school kids to take home, I didn't want to add any nuts in case someone in the family had nut allergies.  So, I mixed in some pretzels and m&m's.


I found these bags with pilgrims on them at Micheal's.  I thought they would we nice to send a little Thanksgiving treat home in.


Sweet and Salty Chex Mix

1 cup butter
1/2 cup packed light brown sugar
1 box Rice Chex Cereal
Nuts (2 cups)
salt

Heat oven to 250 degrees.
Melt butter on low.  Add sugar to melted butter and stir until blended.  The key is to make sure the sugar is dissolved and that the sauce thickens (but too thick, just so the butter and sugar are well mixed together) and starts to becomes caramel-like.
Place the cereal in a large roasting pan.  Pour sauce over cereal and stir.
You can mix in nuts with the cereal to toast.  But, we just always add them in at the end.
Place the pan in the oven and toast for 1 hour.  Stir every 15 minuets.  Put on a brown paper bag and salt.

Add in whatever mix-ins you want.  We usually add in peanuts and m&m's. 

What I Wore the Week of November 18, 2013


Monday.

Tuesday.

Wednesday:  I love skirts like this with leggings.  It is like wearing sweats.  The leggings our cotton and stretchy and the skirt is flowy.  So, you can still move. 

Thursday:  I had physical therapy at 7:00 in the morning, right before school.  I got the "ok" to walk for a couple minuets then jog for a couple minuets... to switch off doing that!  So, I just wore sweats to school that day. 


Friday.

Wednesday, November 20, 2013

Cranberry Wild Rice Bread


Two summers ago, we were in Duluth with some relatives.  And, what do you do?  Go out to eat.  It was decided that we were going to go to Perkins.  Well, I did not want to go to Perkins.  And, I let that be known.  You can go to Perkins just about anywhere.  We were in Duluth, with lots of fun restaurant, why not go somewhere more unique?  So, we ended up going to this little Scandinavian restaurant, Takk For Maten.  There, I got a grilled sandwich, on cranberry wild rice bread.  It was so good.  It made me want to learn to make some bread like that, so I could make a sandwich like that.


This is what I've found.  This bread is super easy to make and super delicious.

Cranberry Wild Rice Bread

1 cup cooked wild rice (I usually use canned cooked wild rice, but I would not be against cooking it myself)
1 1/2 cups pecans (I never add these, but the bread would be excellent with them)
2 cups warm water
1 pkg. active dry yeast, or 2 1/2 teaspoons
1/4 cup honey
1 cup whole wheat flour*
2 teaspoons salt
4 cups all-purpose or bread flour*
1 cup dried cranberries, or other dried fruit such as cherries or raspberries

*I do a little more whole wheat flour and a little less white.  About 2 1/2 cups whole wheat and 2 1/2 white.  Just use whatever combination to make a total of 5 cups flour.

In the bowl of a standing mixer, mix the warm water with the yeast and honey until the honey is dissolved.  The recipe says to start off with a paddle attachment and then switch it to the hook, but I just do it all with a hook attachment.  Let stand for minutes, until bubbly.

Sift in the whole wheat flour and salt.  Beat until a smooth dough forms.  Mix in 2 more cups of flour until smooth.  Add the wild rice, pecans, and cranberries, and mix until incorporated.  Add the remaining flour and mix at medium speed until soft, springy dough forms, about 10 min.
*I actually took mine out of the mixer, and kneaded the dough on a floured surface.  That way I could grease the bowl it was going to rise in.  Greasing the bowl will help in come out better.* 
Cover with plastic wrap and let stand in a warm place until doubled in size, about an hour.

Turn the dough out onto a lightly floured surface.  The original recipe says this makes two loaves, but I like the size of one loaf better.  But, one loaf it kinda big, so I just cut off a small portion of the dough and throw that little piece away.  Place the loaf into a loaf pan.  I like the way bread turns out when the pan is lined with parchment paper.  Let the dough rise until doubled in size, about 45 minuets.

Bake at 375 degrees for about 35 to 40 minuets.


This grilled sandwich was delicious!!!  I put ham, spinach, and tomato in the sandwich.  Buttered the outside of the sandwich and grilled it on the girdle.  Yum.  Yum.
This bread also makes great cold sandwiched.

Tuesday, November 19, 2013

Senior Pictures

So, it was about time that everyone was doing senior pictures.  Most people, I think, do them at the end of summer or at the beginning of the school year of their senior year.  Well, at that time... I had a cast on my ankle.  So, I just had to wait till that was off to take senior pictures.  It has taken me a while to post these pictures, but better late than never.

I had my friend Tikvah took my pictures.  She is getting into photography, and needs some things to take pictures of to get started.  She did an awesome job!  We did most of them out at my house, and then went into town to finish them up.  There are some old buildings in town that make nice backgrounds.

For the clothes... I didn't even know what I was going to wear until about an hour before I was going to have the pictures taken.  I decided to do three outfits.  I love what I ended up picking out of my closet.

Quick story:  I like to get my eye brows waxed every now and then... especially before I get my pictures taken.  I was up at my grandma and grandpa's the day before I was going to have my pictures taken.  So, my mom tried to find a place where I could get them done.  Where I usually get them done, LIV Aveda, it is only $15 to have a wax.  But, it wasn't going to work for me to go there.  Up by my grandparents', it costs a lot more, plus we couldn't find anywhere with an opening.  I ended up going to the Aveda Institute, because  they welcome walk-ins and it is a lot cheaper.  That is where LIV Aveda employees go to get trained (they are called students).  So, my mom and I walked in.  It is about 11:40 am.  I got scheduled for an appointment.  But, I had to wait a little while (maybe 20 min.) because the students had a lunch break.  A lot of the workers and students there were kind of creapy - crazy died hair, tattoos, and unnecessary piercings.  I hoped the student that was going to wax my eye brows wasn't like that.  Luckily, she wasn't.  When she called my name, she introduced herself, and shook my hand (I noticed that all the students had to do that).  We went upstairs.  Upstairs, it was like a big warehouse, filled with rows of work booths (chair, mirror, and little hair cutting desk).  It was packed.  The lady that was going to wax my eye brows, sat me at her booth.  Then I had to fill out a form, and she had to make sure she knew exactly what I wanted done.  Then, she had to get her teacher's approval.  That took a while, since there were so many students and not that many teachers.  Finally, she got approved to wax my eye brows, and so she did.  She did a good job.  But, before I left, she had to get her teacher's approval of what she did.  And, that took awhile.  Finally, I was free to go.  I was up there for about an hour (a normal waxing takes like 15 min.).  My mom was waiting for me downstairs, and was probably getting a little worried.

Here are some of my senior pictures!


Tikvah also took some individual pictures of my brothers and sister, then all of us kids together, the girls, the boys, and some family pictures.